相信對于手機的時間日期設置大家一定都不陌生吧,今天舉一個關于時間日期設置的示例,其中有些許不完善之處,例如如何使設置的時間日期和手機系統同步等。感興趣的讀者可以根據自身經驗加以完善。
現來看看具體示例,希望對大家有所幫助。
首先是時間設置:
.java文件(MainActivity.java)代碼如下:
package com.example.activity_time_date;import java.util.Calendar;import android.app.Activity;import android.app.Dialog;import android.app.TimePickerDialog;import android.content.Intent;import android.os.Bundle;import android.view.Menu;import android.view.MenuItem;import android.view.View;import android.view.View.OnClickListener;import android.widget.Button;import android.widget.TextView;import android.widget.TimePicker;public class MainActivity extends Activity { private TextView mytext = null; private Button mybutton1 = null; private Button mybutton2 = null; private int mHour; private int mMinute; static final int TIME_DIALOG_ID = 0; private TimePickerDialog.OnTimeSetListener mTimeSetListener = new TimePickerDialog.OnTimeSetListener() { @Override public void onTimeSet(TimePicker view, int hourOfDay, int minute) { // TODO Auto-generated method stub mHour = hourOfDay; mMinute = minute; updateDisplay(); } }; @Override protected void onCreate(Bundle savedInstanceState) { super.onCreate(savedInstanceState); setContentView(R.layout.activity_main); mytext = (TextView)findViewById(R.id.textview); mybutton1 = (Button)findViewById(R.id.button1); mybutton2 = (Button)findViewById(R.id.button2); mybutton1.setOnClickListener(new OnClickListener() { @Override public void onClick(View v) { // TODO Auto-generated method stub showDialog(TIME_DIALOG_ID); } }); mybutton2.setOnClickListener(new OnClickListener() { @Override public void onClick(View v) { // TODO Auto-generated method stub MainActivity.this.startActivity(new Intent(MainActivity.this, dateActivity.class)); } }); final Calendar cal = Calendar.getInstance(); mHour = cal.get(Calendar.HOUR_OF_DAY); mMinute = cal.get(Calendar.MINUTE); updateDisplay(); } private void updateDisplay(){ mytext.setText(new StringBuilder().append(pad(mHour)).append(":") .append(pad(mMinute))); } private static String pad(int i){ if (i >= 10) return String.valueOf(i); else return "0" + String.valueOf(i); } @Override protected Dialog onCreateDialog(int id) { switch (id) { case TIME_DIALOG_ID: return new TimePickerDialog(this, mTimeSetListener, mHour, mMinute, false); } return null; }}布局文件(activity_main.xml)代碼如下:
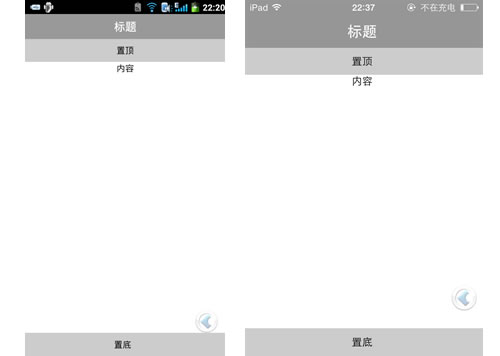
<RelativeLayout xmlns:android="http://schemas.android.com/apk/res/android" xmlns:tools="http://schemas.android.com/tools" android:layout_width="match_parent" android:layout_height="match_parent" tools:context="${relativePackage}.${activityClass}" ><LinearLayout android:layout_width="fill_parent" android:layout_height="fill_parent" android:orientation="vertical" > <TextView android:id="@+id/textview" android:layout_width="wrap_content" android:layout_height="wrap_content" /> <Button android:id="@+id/button1" android:layout_width="fill_parent" android:layout_height="wrap_content" android:text="設置時間" /> <Button android:id="@+id/button2" android:layout_width="fill_parent" android:layout_height="wrap_content" android:text="下一頁" /></LinearLayout></RelativeLayout> 運行效果如下圖所示:


日期設置和時間設置基本一致,在此不再贅述。讀者可以調試并改進本文示例代碼,相信會有新的收獲!
新聞熱點


疑難解答
圖片精選