前文簡(jiǎn)單介紹了Android中SurfaceView的基本使用,本文就來(lái)介紹一下SurfaceView與多線程的混搭。SurfaceView與多線程混搭,是為了防止動(dòng)畫閃爍而實(shí)現(xiàn)的一種多線程應(yīng)用。android的多線程用法與JAVA的多線程用法完全一樣,本文不做多線程方面的介紹了。直接講解SurfaceView與多線程的混合使用,即開(kāi)一條線程專門讀取圖片,另外一條線程專門繪圖。
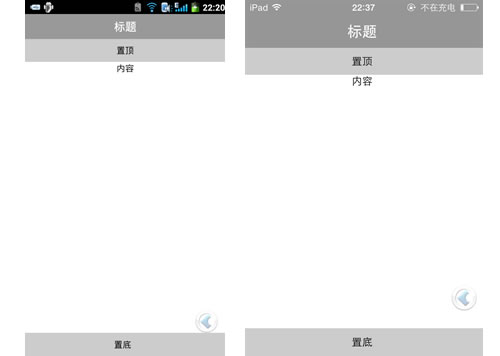
本文程序運(yùn)行截圖如下,左邊是開(kāi)單個(gè)線程讀取并繪圖,右邊是開(kāi)兩個(gè)線程,一個(gè)專門讀取圖片,一個(gè)專門繪圖:

對(duì)比一下可以看出,右邊動(dòng)畫的幀速明顯比左邊的快,左右兩者都沒(méi)使用Thread.sleep()。為什么要開(kāi)兩個(gè)線程一個(gè)讀一個(gè)畫,而不去開(kāi)兩個(gè)線程像左邊那樣都“邊讀邊畫”呢?因?yàn)?span style="color: #ff0000">SurfaceView每次繪圖都會(huì)鎖定Canvas,也就是說(shuō)同一片區(qū)域這次沒(méi)畫完下次就不能畫,因此要提高動(dòng)畫播放的效率,就得開(kāi)一條線程專門畫圖,開(kāi)另外一條線程做預(yù)處理的工作。
main.xml的源碼如下:
<?xml version="1.0" encoding="utf-8"?><LinearLayout xmlns:android="http://schemas.android.com/apk/res/android" android:layout_width="fill_parent" android:layout_height="fill_parent" android:orientation="vertical"> <LinearLayout android:id="@+id/LinearLayout01" android:layout_width="wrap_content" android:layout_height="wrap_content"> <Button android:id="@+id/Button01" android:layout_width="wrap_content" android:layout_height="wrap_content" android:text="單個(gè)獨(dú)立線程"></Button> <Button android:id="@+id/Button02" android:layout_width="wrap_content" android:layout_height="wrap_content" android:text="兩個(gè)獨(dú)立線程"></Button> </LinearLayout> <SurfaceView android:id="@+id/SurfaceView01" android:layout_width="fill_parent" android:layout_height="fill_parent"></SurfaceView></LinearLayout>
Java程序的源碼如下:
package com.testSurfaceView;import java.lang.reflect.Field;import java.util.ArrayList;import android.app.Activity;import android.graphics.Bitmap;import android.graphics.BitmapFactory;import android.graphics.Canvas;import android.graphics.Paint;import android.graphics.Rect;import android.os.Bundle;import android.util.Log;import android.view.SurfaceHolder;import android.view.SurfaceView;import android.view.View;import android.widget.Button;public class testSurfaceView extends Activity { /** Called when the activity is first created. */ Button btnSingleThread, btnDoubleThread; SurfaceView sfv; SurfaceHolder sfh; ArrayList<Integer> imgList = new ArrayList<Integer>(); int imgWidth, imgHeight; Bitmap bitmap;//獨(dú)立線程讀取,獨(dú)立線程繪圖 @Override public void onCreate(Bundle savedInstanceState) { super.onCreate(savedInstanceState); setContentView(R.layout.main); btnSingleThread = (Button) this.findViewById(R.id.Button01); btnDoubleThread = (Button) this.findViewById(R.id.Button02); btnSingleThread.setOnClickListener(new ClickEvent()); btnDoubleThread.setOnClickListener(new ClickEvent()); sfv = (SurfaceView) this.findViewById(R.id.SurfaceView01); sfh = sfv.getHolder(); sfh.addCallback(new MyCallBack());// 自動(dòng)運(yùn)行surfaceCreated以及surfaceChanged } class ClickEvent implements View.OnClickListener { @Override public void onClick(View v) { if (v == btnSingleThread) { new Load_DrawImage(0, 0).start();//開(kāi)一條線程讀取并繪圖 } else if (v == btnDoubleThread) { new LoadImage().start();//開(kāi)一條線程讀取 new DrawImage(imgWidth + 10, 0).start();//開(kāi)一條線程繪圖 } } } class MyCallBack implements SurfaceHolder.Callback { @Override public void surfaceChanged(SurfaceHolder holder, int format, int width, int height) { Log.i("Surface:", "Change"); } @Override public void surfaceCreated(SurfaceHolder holder) { Log.i("Surface:", "Create"); // 用反射機(jī)制來(lái)獲取資源中的圖片ID和尺寸 Field[] fields = R.drawable.class.getDeclaredFields(); for (Field field : fields) { if (!"icon".equals(field.getName()))// 除了icon之外的圖片 { int index = 0; try { index = field.getInt(R.drawable.class); } catch (IllegalArgumentException e) { // TODO Auto-generated catch block e.printStackTrace(); } catch (IllegalAccessException e) { // TODO Auto-generated catch block e.printStackTrace(); } // 保存圖片ID imgList.add(index); } } // 取得圖像大小 Bitmap bmImg = BitmapFactory.decodeResource(getResources(), imgList.get(0)); imgWidth = bmImg.getWidth(); imgHeight = bmImg.getHeight(); } @Override public void surfaceDestroyed(SurfaceHolder holder) { Log.i("Surface:", "Destroy"); } } /* * 讀取并顯示圖片的線程 */ class Load_DrawImage extends Thread { int x, y; int imgIndex = 0; public Load_DrawImage(int x, int y) { this.x = x; this.y = y; } public void run() { while (true) { Canvas c = sfh.lockCanvas(new Rect(this.x, this.y, this.x + imgWidth, this.y + imgHeight)); Bitmap bmImg = BitmapFactory.decodeResource(getResources(), imgList.get(imgIndex)); c.drawBitmap(bmImg, this.x, this.y, new Paint()); imgIndex++; if (imgIndex == imgList.size()) imgIndex = 0; sfh.unlockCanvasAndPost(c);// 更新屏幕顯示內(nèi)容 } } }; /* * 只負(fù)責(zé)繪圖的線程 */ class DrawImage extends Thread { int x, y; public DrawImage(int x, int y) { this.x = x; this.y = y; } public void run() { while (true) { if (bitmap != null) {//如果圖像有效 Canvas c = sfh.lockCanvas(new Rect(this.x, this.y, this.x + imgWidth, this.y + imgHeight)); c.drawBitmap(bitmap, this.x, this.y, new Paint()); sfh.unlockCanvasAndPost(c);// 更新屏幕顯示內(nèi)容 } } } }; /* * 只負(fù)責(zé)讀取圖片的線程 */ class LoadImage extends Thread { int imgIndex = 0; public void run() { while (true) { bitmap = BitmapFactory.decodeResource(getResources(), imgList.get(imgIndex)); imgIndex++; if (imgIndex == imgList.size())//如果到盡頭則重新讀取 imgIndex = 0; } } };}希望本文所述示例能對(duì)大家進(jìn)行Android的SurfaceView與多線程的混搭編程有所幫助。
新聞熱點(diǎn)


疑難解答
圖片精選