打開新文件,在此我用500×500,白色背景。
選擇字體,你的各種風格. 我有點氣派選擇字體稱為"cocon"

步驟2-
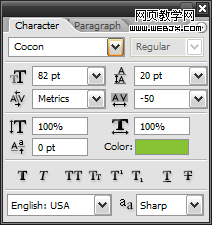
你現在想格式. 打開你性格窗口(如果它尚未打開)航行窗>性格. 現在只要你是性格調色板,改變了這里的環境表現.另外,現在是時候選擇顏色. 我將石灰綠(#87c332),因為我認為好看的目的 .
步驟3-交融效果
right click your text layer, and open blending effects.
點擊右文貴層,并開放交融的效果.
we are only going to add a base gradient to the layer, all other effects will be on new layers.
我們只是去補充基地的梯度層,其他一切后果將新層.
* check “gradient overlay”*
檢查"梯度疊加"
* leave the default gradient*
離開違約梯度
* set the blending mode to “soft light”混合模式*定為"輕軟"
* set the opacity to around 70%*定混濁70%左右
開始中英對照````嘿嘿```

第四步先進效應
now for some more advanced effects.
現在有些更先進的效果.
we are going to start with giving it a nice organic look.
我們要使它具有很好的有機先從看看.
create a new layer on top of your current text layer, name it "brush" or "gloss".
創造一個新的層次上您當前文本層,名稱是"刷"還是"美化".
* set the opacity to 70%*混濁定為70%
* set the blending mode to "overlay"混合模式*定為"疊加"
now take out your brush tool.現在購買你刷工具.
a reasonable size should be about a third the height of your text.合理的規模應約三分之一高度貴文.
set the color to brush with to white, and brush all the way
載有白顏色來刷、刷一路
through the middle of the text.
文中通過.
you should be getting a yellowish tinge.
你應該帶黃色彩越來越.
hold down your control button and click the text layer, but make sure that the brush (or gloss, whatever you named it) layer is selected.
點擊控制按鈕,你壓低文層,但要確保刷(或光澤、不管你命名)選定層. then go to select -> modify -> contract.
然后選擇->修改->合約.
i set "2px" for my text, but you can do 1, 2, or even 3px if you have bold text.
我已經把"2px"我的文字,但你可以做一,二,甚至大膽3px如果你有文. anything over 3 will look bad.300什么會難為情. right click the newly made selection, click "select inverse" and then hit the delete button.
點擊新近做出正確選擇,按"逆選擇",然后撞上刪除按鈕.
de-select and have a look at it.
德責,看一看.
yours should be similar to the picture shown here.
你應該表現出類似的畫面.

步驟5添加一些陰影
you’re almost done!你做得差不多了!
pat yourself on the back.拍你的背部.
for our final step we are going to add a nice silvery/metallic stroke around the text.
我們要為我們的最后一步加入一個漂亮的銀白色/金屬中風文左右.
make a new layer, name it "outline"
作出新層,名稱是"綱要"
* blending mode: normal*融合模式:正常
* opacity: 100%*混濁:100%
ctrl + click the text layer but have this layer selected (like last step), select -> modify -> expand: 2px.
七月+點擊文本層這層卻選擇(如最后一步),選擇->修改->擴展:2px. fill this with white.
填補這個白.
alright, almost done, now to add blending effects to this outline layer.
還好,幾乎做,現在加上一層混合效果這一綱要. right click on the layer and go to blending effects, check "drop shadow" and "gradient overlay".
右點擊進入混合層和效果,檢查"降影子"和"梯度疊加". for drop shadow, leave all settings default except these:為減少陰影,離開這一切場合違約除外:
* opacity: 15%*混濁:15%
* distance: 2px*距離:2px
* size: 0px*尺寸:0px
that should leave a soft drop shadow.軟下跌,應該留下陰影.
now on to editing the gradient.現在就來編輯梯度.
use these settings:這些場合使用:
* blend mode: normal*融模式:正常
* opacity: 30%*混濁:30%
now, click on the thumbnail of the current gradient, a gradient editing window should pop up.
現在,點擊縮略圖就當前的梯度,梯度編輯窗口應該流行起來.
make your gradient look like screenshot.你screenshot梯度樣子.

步驟6-那!
alright, you are done!
好吧,你做了!
if you'd like you can add a soft blue background like i did.
如果你想你可以加入軟藍色背景和我一樣.
simply create a new layer and place it behind your text layers.干脆創造一個新的層次,你把它后面文本層.
on this layer add a light gradient to really make your text stand out.加上這層梯度切實做到你文光當當.
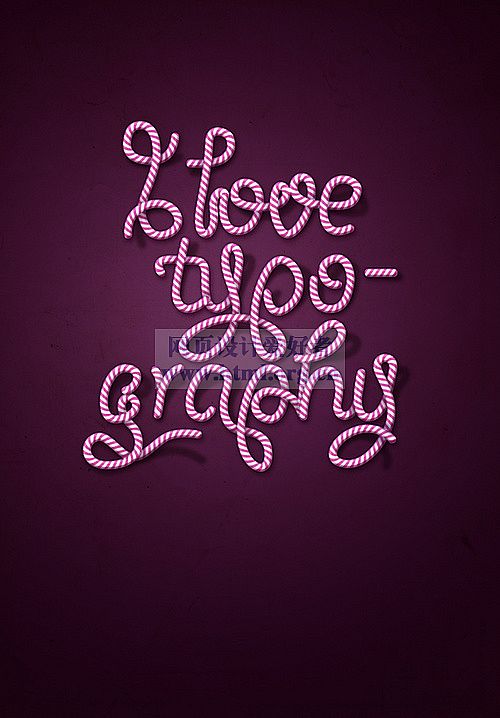
最后效果:

新聞熱點


疑難解答